If you have never set up a blog or website before, it can all sound quite technical. But it is not really. There are only a few steps to take, and within about 15 minutes or less you can have your own .com up and running with hosting and WordPress installed. Whether you want to start a food blog, travel, DIY, or lifestyle blog, I will show how to start a blog in 3 steps.
What You Need To Start
There are 3 things you need to start a blog:
- A .com domain name
- A hosting account – this is a company that keeps all of your blog files, and delivers them to the screens of the people visiting your blog
- WordPress
If you don’t have a name yet, I have a post that can help you with that: Blog Names Ideas: How To Create A Memorable Name
And if you have not checked to see if your domain is available yet, type it into the search bar at name.com to see if it is available.
Getting Started – Getting Your .com And Hosting Together
The first step is to get your .com. When you sign up to for a hosting account from Bluehost you will get a .com for free.
And when you sign up for a .com with the same company that does your hosting, you don’t have to add in the technical steps of trying to connect the 2 together – since both will already be in the same place.
We are going to use Bluehost, as this is the one I have been with for the last 5-6 years. Not only will you get a free .com, but it is really easy to set up WordPress with your .com (it only takes a few clicks).
So lets get started.
Head on over to Bluehost.
Click the green ‘Get Started Now’ button
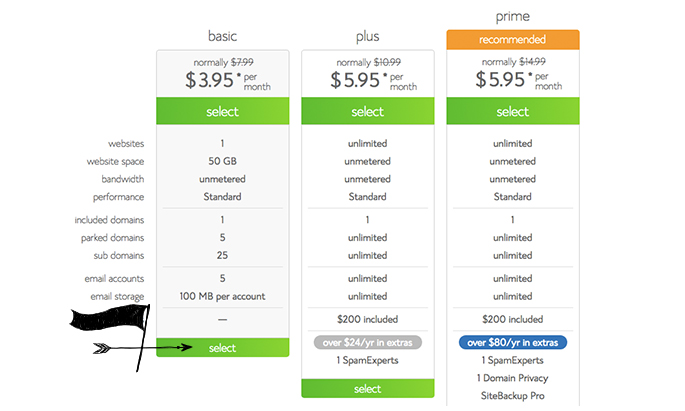
And select the Basic plan, seen below. It does say the price is per month, but this is paid upfront for the year. This helps you save money. There is also a 24 month and 36 month option, and the longer you sign up for the cheaper it is as a monthly cost. The 12 month basic plan ends up being $5.95 a month ($71.40 for the year).

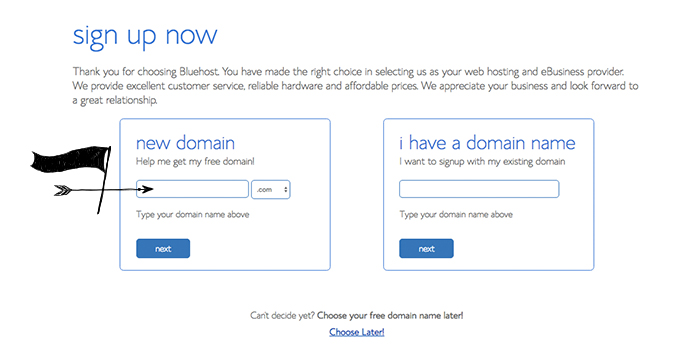
Then enter in your blog name into the “new domain” box shown below.

On the next page, enter in your details for the “account information” section.
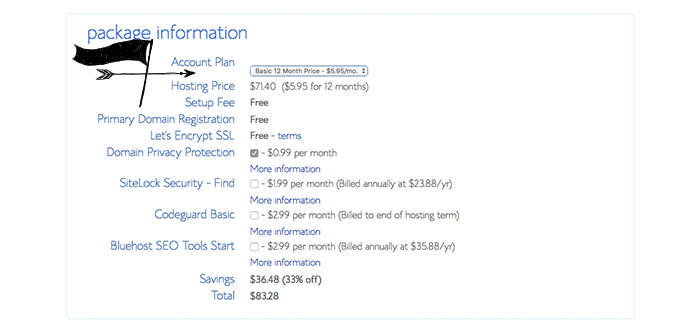
In next section “package information”, select the plan length you want. And the only checkbox you need checked is “Domain Privacy Protection” as this will hide your personal information from public records. Everything else can be left unchecked.

Then all you have to do is enter your billing info and hit submit at the bottom.
Setting Up WordPress
Log into your Bluehost account to begin setting up WordPress.
Scroll down to the “Website” section, and click on “Install WordPress”.

Then under “domain” select your blog name, and click next. If you get a message saying you are overwriting what is there already, that is alright since we are starting a brand new blog.

Next, type in the name of your website, along with your what you want your login details to be. These will be used when you want to log into your WordPress blog. Click next.

That is it. Bluehost is now installing WordPress onto your .com domain.
You are all done setting up your blog.
Next Steps – Making It Look Good
You can log into your blog by typing your url, and adding /wp-admin to the end of it. So www.mynewblog.com/wp-admin
Once you are logged in, you can start adding posts.
You will most likely want to change the look and design of your new blog. And you can do that in the Appearance —> Themes section in the sidebar.
Here you can view all of the available free themes. Though you’d probably want a better looking one, so check out Genesis Child Themes which is a great place to get good looking themes (the Foodie Pro Theme, is great for food bloggers).
If you ever buy a theme, it will come as a .zip file. Go to Appearance —> Themes in the sidebar of your WordPress dashboard. At the top click on “Add New”. And on the next page at the top click on the “Upload Theme” and select the .zip file you have. Once your theme is uploaded to your WordPress, you will then need to click on “activate” to use the new theme.
I hope that has helped you get your blog started with a .com, along with getting WordPress set up.
Now you can start creating your content. Other steps that you can take include having a logo created for your blog, and maybe look into buying a graphic set to brand your blog. You can view my blog posts below that help you through those steps.
Recommended Reading
